TypeScript 實戰:後端驗證與中間件
前言
在開發後端應用程式時,資料驗證和中間件的設計是非常重要的。這不僅能確保資料的正確性,也能提升 API 的穩定性。在這篇文章中,我們將使用與 TypeScript 很搭的 Zod 進行資料驗證,並撰寫一個簡單的 Express 中間件來處理錯誤。
Zod 套件
Zod 是一個功能強大的 TypeScript 驗證套件,它允許我們用簡潔的語法來定義資料結構和約束。相比其他驗證庫,Zod 更加貼合 TypeScript 的型別系統,並且支援推斷型別。這讓我們能夠從 Schema 中自動生成 TypeScript 型別,減少重複代碼。更多資訊可以查看 Zod 的文檔
首先我們安裝 Zod
npm i zod撰寫驗證
在這裡,我們使用 Zod 來驗證我們要存的 Task 資料。Task 包含以下幾個欄位:標題、描述、狀態、以及預估的 Story Point。透過 z.object 定義一個 Zod Schema,並利用 z.infer 的方式來生成對應的 TypeScript 型別。
import { z } from 'zod'
// ...
export const inputTaskSchema = z.object({
title: z.string().min(1),
description: z.string().optional(),
status: z.enum(['new', 'active', 'completed']).default('new'),
storyPoint: z.number().optional(),
})
export interface TaskType extends z.infer<typeof inputTaskSchema> {
id: string
}
export default class TaskModel extends AbstractBaseModel<TaskType> {
collection = 'task'
validateData(data: unknown): z.infer<typeof inputTaskSchema> {
return inputTaskSchema.parse(data)
}
}撰寫新增邏輯
接下來,我們在 Controller 撰寫一個 createTask 函式,負責新增一個 Task。這裡透過 taskModel.validateData 來驗證傳入的資料,確保資料符合 Schema 的約束。
// ...
export async function createTask(req: Request<{}, {}, TaskType>, res: Response<{ id: string }>, next: NextFunction) {
try {
const task = taskModel.validateData(req.body)
const id = await taskModel.create(task)
res.status(201).json({ id })
}
catch (error) {
next(error)
}
}撰寫中間件(middleware)
在 Express 中,中間件(middleware)是處理請求和響應的一個重要組件,通過 use 調用,可以在請求處理的不同階段插入特定邏輯。
以下是三個都是中間件:
express.json是 Express 提供的中間件,使用express.json()來解析req.body傳入的 JSON 請求。- 第一個參數如果有傳路徑,就會根據這個路徑來執行第二個參數的中間件。
- 錯誤處理中間件,需要使用 4 參數(就算不使用 next,也是要定義出來),Express 就會將這個中間件視為錯誤處理中間件,我們將 Zod 的驗證錯誤以 400 狀態碼返回。
import express, { NextFunction, Request, Response } from 'express'
import { ZodError } from 'zod'
// ...
class Server {
// ...
start() {
this.app.use(express.json())
this.app.use('/task', taskRouter)
this.app.use((err: Error, req: Request, res: Response, next: NextFunction) => {
if (err instanceof ZodError) {
res.status(400).json({ message: err.errors })
}
else {
res.status(500).json({ message: err.message })
}
next()
})
this.app.listen(port, () => {
console.log(`Server is running on port ${port}`)
})
}
}
// ...測試 API
我們可以使用 REST Client 工具來測試 API,將資料傳送至後端並驗證其是否新增成功。
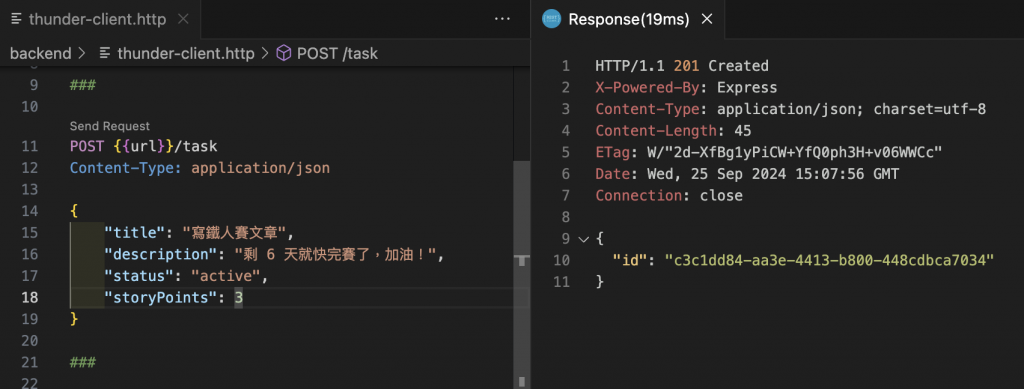
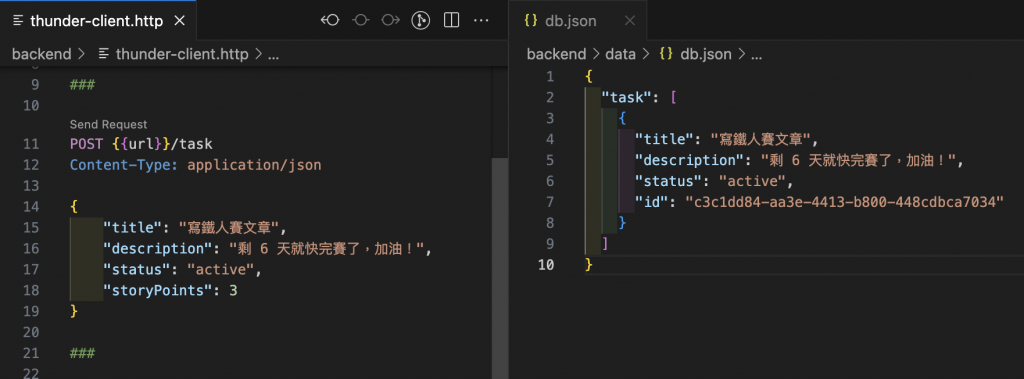
若操作成功,可以在 db.json 檔案中檢查是否有新的 Task 被新增。
總結
這篇文章展示了如何透過 Zod 進行資料驗證,並撰寫 Express 的中間件來處理驗證錯誤。我們也撰寫完新增的邏輯,後面編輯與刪除的邏輯也是差不多的寫法,後端的部分大致上已經差不多了,下一篇我會介紹如何利用 TypeScript 5 新的裝飾器來重構我們的 Controller,並讓架構更精簡。
本篇程式碼變更可以看此 PR
Related Posts
TypeScript 後記
終於完成連續三十天的鐵人賽文章撰寫!距離我第一次參加鐵人賽已經三年之久了。這次參加主要是因為朋友邀請一起參賽,同時我自己也想藉此機會深入了解 TypeScript 5 的新功能,強迫自己透過寫作來吸收知識。
TypeScript 實戰:製作 npm Package
在開發專案時,經常會遇到跨專案共用邏輯或工具的情況,例如常用的 logger 或驗證工具。如果每次都從一個專案複製貼上到另一個專案,難免會出現版本不同步或維護困難的問題。為了解決這類問題,我們可以將這些共用邏輯獨立成為 npm 套件,以便在多個專案中重複使用。
TypeScript 實戰:前端表單與串接 API
在現代前端開發中,與後端進行資料交換是常見的需求。透過 HTTP 請求,我們可以將資料送出並取得結果。這篇文章將介紹如何使用 TypeScript 實作前端表單與串接 API,並展示如何將這些功能結合到 React 應用中。同時,文章還會介紹如何解決跨域問題(CORS),以便讓前後端能順利溝通。

Johnson Mao
A passionate software engineer and blogger sharing thoughts on technology, AI, and development.